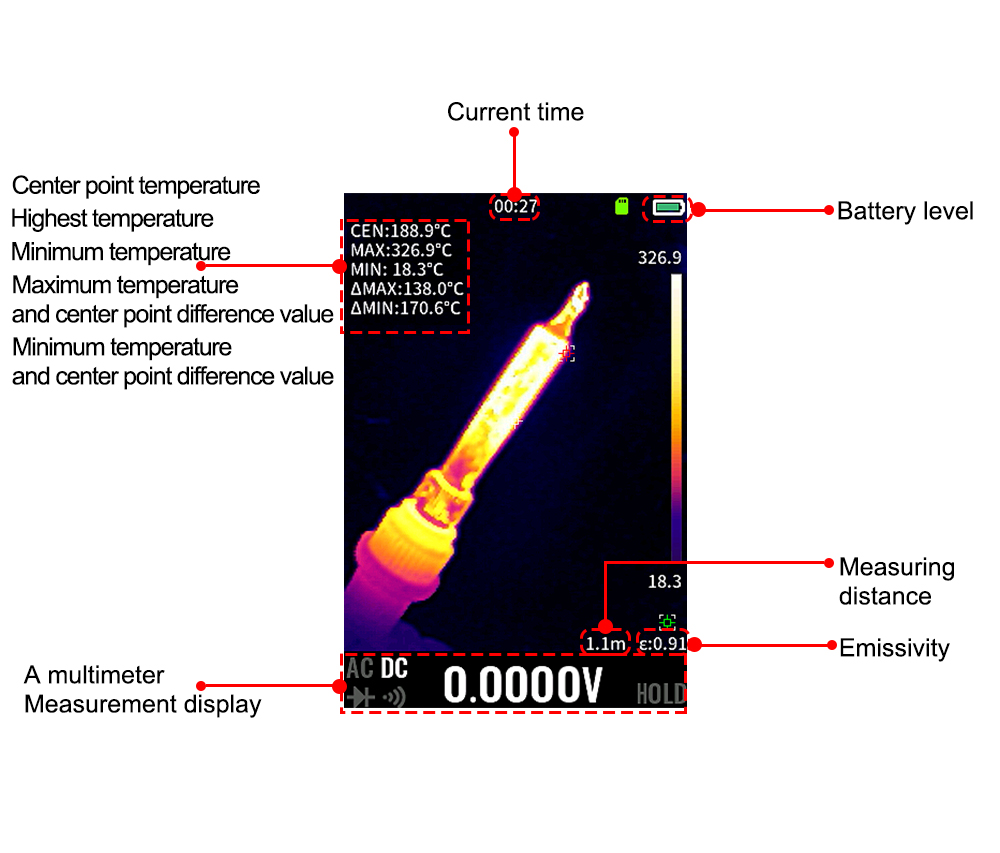
The thermal imaging interface has measurement functions such as center temperature, maximum temperature, minimum temperature, maximum and minimum temperature difference, and displays multimeter measurement data. The following figure shows the functional description of the thermal imaging interface.
(Note:
The larger the temperature difference, the better the display effect.
During measurement, the interface may stutter and a “clicking” mechanical sound can be heard, which is a normal phenomenon. This is because thermal imaging is sensitive to changes in ambient temperature, and internal temperature changes can cause inaccurate temperature measurements and blurry images. Therefore, automatic calibration processing will be performed internally.
Inaccurate setting of the measurement gear may result in blurry images. It is possible to estimate the approximate temperature of the object being measured and set the temperature measurement gear accordingly.
If the temperature measurement is inaccurate, you can check if the emissivity is set correctly; When measuring metal objects, there is a significant difference in emissivity between smooth surfaces and oxidized surfaces.)

1. Screen capture and save function
Long press the function button  ,A screenshot save success prompt dialog box will appear in the center of the screen, indicating that the screenshot save is complete. To view screenshot files,Long press the function button
  ,Enter the settings menu interface, select the “File” menu to view the saved content.
2. Temperature measurement
By moving the crosshair at the center of the screen to the object being measured on a mobile device, the current temperature of the object can be measured;
Long press the function button  ,Enter the settings menu interface and set relevant parameters such as “emissivity”, “distance”, “temperature range”, “unit”, etc.
3. Emissivity adjustment
Long press the function button  , Go to the settings menu ->select
the”emissivity” menu to change the emissivity, and choose different emissivity according to the material of the tested object;
You can select “Custom” and press the up and down arrow keys on the screen to customize the emissivity value. Long pressing the up and down arrow keys on the screen can speed up the adjustment.
4. Temperature gear switching
Long press the function button  ,Go to the settings menu ->select the “Temperature Range” menu to change the temperature gear. The default gear is automatic, which can be switched according to the temperature range of the object being measured. The high temperature gear is suitable for measuring objects between 100 ℃ and 550 ℃, while the low temperature gear is suitable for measuring objects between -20 ℃ and 150 ℃.
In automatic mode, it is normal for the measurement object temperature to freeze for 2-3 seconds when switching from low temperature to high temperature or from high temperature to low temperature.
5. Color board switching
In thermal imaging mode, long press the button on the right side of the device to switch between different color palettes. There are 15 color palettes: white hot, black hot, fusion 1, rainbow, fusion 2, iron red 1, iron red 2, dark brown, color 1, color 2, ice and fire, rain, green hot, red hot, and dark blue.
6. Alarm settings
Long press the function button  Enter the settings menu ->select the “Alarm Settings” menu. After the “Enable” status is turned on, the “Light Alarm” and “Sound Alarm” states can be turned on. Select the “Rules” menu on this interface, press the corresponding up and down arrow keys on the screen to determine whether the alarm rule is “<less than” or “>greater than”. Press the return button to exit the rule settings. Select the “Alarm Threshold” menu downwards and set the alarm temperature value. The corresponding up and down arrow keys on the screen can adjust the temperature value. Press the return option to exit the settings interface.
7. Temperature unit
Long press the function button  Go to the settings menu ->select the “Units” menu, and press the confirm option continuously to switch temperature units. Temperature units include ℃, ℉, and K.
8. Display parameters
Long press the function button  Enter the settings menu ->select the “Display Parameters” menu, enter the display settings interface, select one of the parameters, press the confirmation option “Disable”, press the confirmation option “Enable” again, and press the corresponding up and down arrow keys on the screen to set other parameters. The setting method is the same.
9. Measuring distance
Long press the function button  Enter the settings menu ->select the “Distance” menu, press the confirm option to set the measurement distance. The corresponding up and down arrow keys on the screen can change the value size. Return to the option to exit the settings interface. The measurement distance range is 0.3-10 meters.
